How to Tell the Difference Before You Start
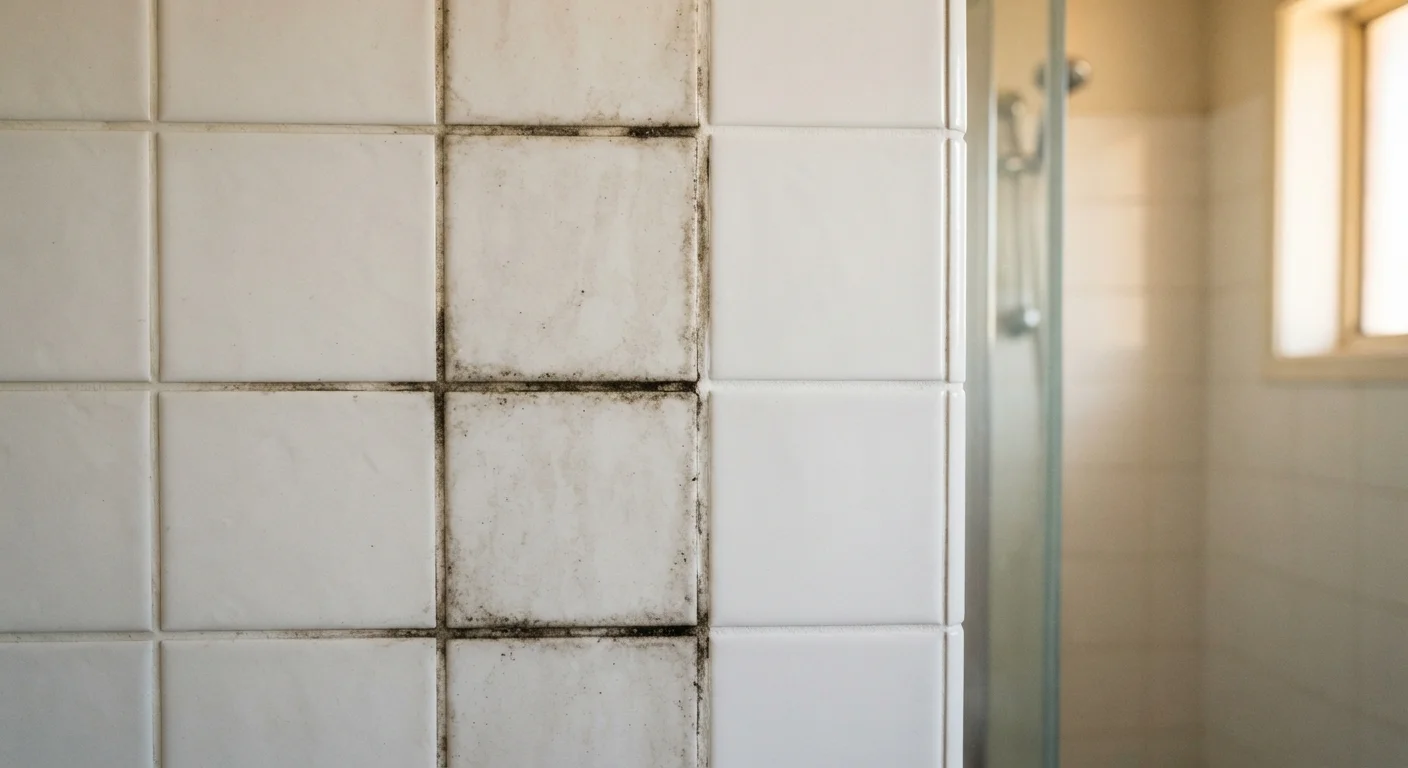
Grout problems tend to look similar at a glance: dark lines, patchy areas, a generally grimy appearance. But what's causing those symptoms matters enormously, because cleaning deteriorated grout wastes your time, while re-grouting grout that just needs scrubbing wastes your money and effort.
Start with a simple physical inspection. Run your fingernail or a key along the grout line. Solid, intact grout won't budge. Grout that crumbles, flakes, or feels sandy is physically breaking down and needs replacement. Next, tap the tile lightly - a hollow sound can indicate that water has already worked behind the tile, loosening the bond.
Visually, look for these signals:
- Cleaning territory: uniform darkening, soap scum buildup, mildew spots, or yellowish staining across intact lines
- Re-grouting territory: cracks running along or across grout lines, sections where grout has fallen out, grout that sits noticeably lower than the tile edge, or persistent black mildew that returns within a week of cleaning
When in doubt, clean first. If the grout comes back looking solid and the staining lifts, you're done. If it doesn't - or if you find physical damage underneath - you have your answer. For a broader look at common DIY decisions like this, see our guide on knowing when DIY is smart and when it's risky.
| Criterion | Grout Cleaning | Re-Grouting |
|---|---|---|
| Addresses | Stains, mildew, soap scum | Cracks, crumbling, missing sections |
| Grout condition required | Structurally intact | Deteriorated or failing |
| Skill level | Beginner-friendly | Moderate DIY skill needed |
| Time investment | 1-2 hours per area | Full day or more, plus cure time |
| Tools needed | Brush, cleaner, sealer | Grout saw, float, new grout, sealer |
| Moisture protection | Restored with sealer | Fully restored with new grout + sealer |
| Typical frequency | Every 6-12 months | Every 8-15 years or as needed |
Cleaning Grout: The Right Approach
Effective grout cleaning doesn't require harsh chemicals. In most cases, a paste made from baking soda and water, applied with a stiff-bristled brush (an old toothbrush works well), will lift surface stains and soap scum without damaging the grout or surrounding tile finish. For mildew, a diluted solution of white vinegar and water can help - though avoid vinegar on natural stone tiles, as the acid can etch the surface.
For heavier staining, oxygen-based cleaners (the kind used for laundry whitening) mixed into a paste and left on the grout for 10-15 minutes before scrubbing are a reliable step up. Always test in an inconspicuous area first.
Avoid Bleach on Colored Grout
Chlorine bleach is often the first thing people reach for on mildewed grout, but it can strip pigment from colored grout and leave it looking patchy or faded. It also doesn't prevent mildew from returning. Oxygen-based cleaners or baking soda-based pastes are gentler and nearly as effective for most household staining.
After cleaning, the single most useful thing you can do is apply a penetrating grout sealer. Grout is porous by nature, which is why it stains so easily. A sealer fills those pores, making future cleaning dramatically easier and slowing mildew development. Reapply sealer roughly once a year in high-moisture areas like showers. This one habit is what separates grout that looks good for years from grout that needs attention every few months - a point echoed in many home maintenance myths that cost homeowners time and money.
Re-Grouting: What It Actually Involves
Re-grouting is a multi-step project, not a quick weekend touch-up. The most important - and most skipped - step is fully removing the old grout before applying new material. Applying fresh grout over damaged grout doesn't bond properly and will fail quickly.
Removal is done with a grout saw or oscillating multi-tool fitted with a grout removal blade. Work carefully to avoid chipping tile edges. Aim to remove grout to a depth of roughly 2-3mm. Once cleared, clean out dust and debris, allow the area to dry completely, then apply new grout following the manufacturer's mixing and application instructions.
A few practical notes:
- Match the new grout type (sanded vs. unsanded) to the existing joint width - sanded grout for joints wider than 1/8 inch, unsanded for narrower lines
- Apply grout in sections, working it into joints at a diagonal angle with a rubber float
- Wipe excess grout with a damp sponge before it fully sets - timing matters here
- Allow full cure time (often 24-72 hours depending on the product) before exposing to water
Re-grouting is genuinely manageable for a first-time DIYer willing to take it carefully. Our article on taking on a home improvement project you've never done before walks through the broader habits - research, tool prep, knowing when to stop - that make unfamiliar tasks go smoothly. Also note that re-grouting in a shower typically works alongside caulk at corner joints and where tile meets the tub; if that caulk is failing too, address it at the same time. See our related piece on why caulk keeps cracking for guidance.
~8-15 yrs
Typical lifespan of well-maintained grout
Grout longevity depends heavily on moisture exposure, sealing frequency, and original installation quality.
1/8"
Joint width threshold for sanded vs. unsanded grout
Joints wider than 1/8 inch require sanded grout for structural stability; unsanded grout shrinks too much in wider gaps.
If you're renting, confirm with your landlord before starting any re-grouting work. While cleaning is always fair game, replacing materials in a unit you don't own may have lease implications or void repair responsibilities. It may also be something your landlord should handle - and a bathroom refresh without a full remodel can show you what's within a renter's reach regardless.